How it started Link to heading
When I decided to resurrect my personal blog a couple of months back I was pretty sure that I want something fast and small that won’t require time to maintain. This narrowed down my choices to the static site frameworks like Hugo and Jekyll. As the latter is built on Ruby, which I’m not a big fan of, Hugo took the crown.
With that sorted out, I had another decision to make. What I should use to host it?
Once you pick up Hugo, you have a lot of options - Netlify, Github Pages, Gitlab, AWS Amplify, S3, you can even host it on an VPS instance LightSail.
As already mentioned I was looking for low maintenance effort and if possible cost effective solution too. As my repositories were going to be in Github, my shortlist was:
- Github Pages (potentially combined with Github Actions, as I wanted to try them from awhile)
- AWS Amplify (for the same reason above stated above - I was looking into it for quite some time)
- Custom solution around S3 static hosting
As I’m using AWS for living in the last couple of years, I scratched the Github idea and did a quick Amplify test. Hugo docs on deploying to Amplify are a good start if you ar leaning down that path. There’s also a nice AWS blog post combining Hugo with Cloud9 and Amplify.
I played around with it, and it looks like a really nice service to build different websites or applications with support for a lot of frameworks, but as actually pointed out in Amplify documentation itself it’s aiming to help frontend developers. And as I’m an infra guy, it was a bit more developer-centric for my taste.
How it looks like Link to heading
With that settled, my solution started to take more shape and in the end this is how it looks like:
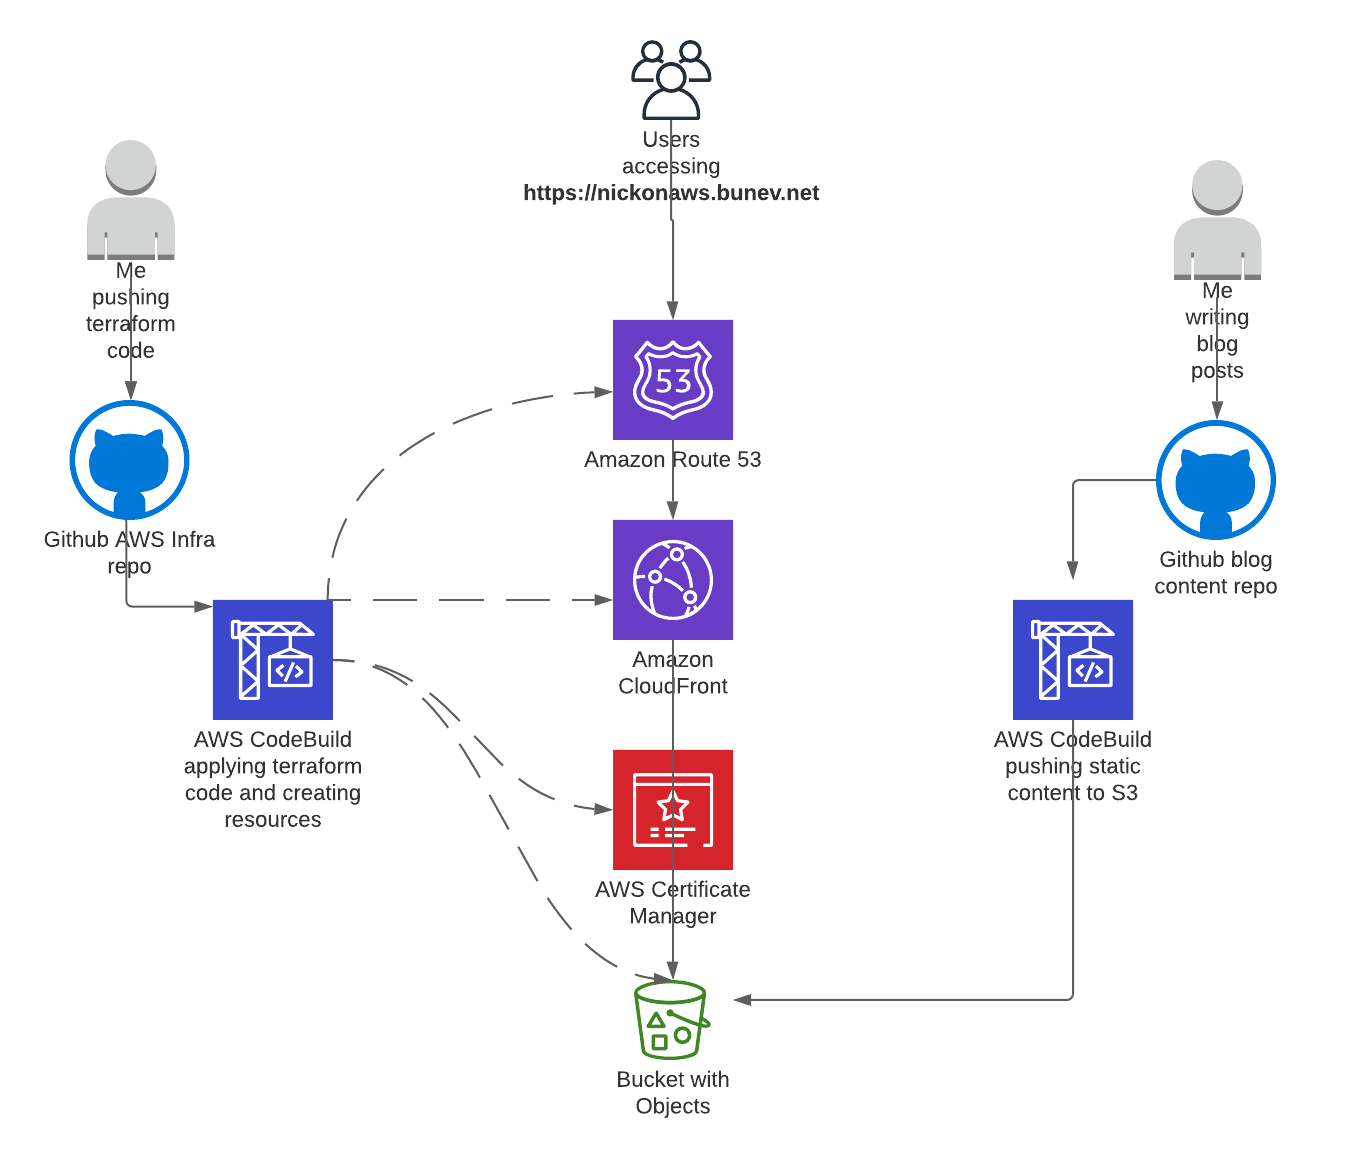
I have two Github repositories - one holding the terraform code for the blog infrastructure, and another one for the actual blog content created with Hugo. Both repositories have webhooks that are starting two AWS CodeBuild projects upon push to the main branch - one applying the terraform code and another that’s publishing the blog content to my public S3 bucket.
The S3 bucket in question has an Amazon CloudFront distribution in front itself and an SSL certificate provisioned from AWS Certificate Manager (ACM). End users are resolving the website address via Route53, where we have a public hosted zone with a record for the CloudFront distribution.
Terraform it all Link to heading
As already pointed out all this is created as Infrastructure as Code (IaC) with terraform. I should mention that I took a shortcut here and instead of writing my own code to do the task I went up using Nickolas Armstrong’s code, with a few changes some additions from me. If you are starting from scratch his repo is quite useful and could be used as is. However, I already had a state bucket with encryption and logging enabled, so I haven’t used that part of the code.
In addition, in his blog post he is doing the certificate validation and the Route53 record manually, so I wrote that piece on my own. My acm.tf looks like this:
# ACM Certificate
resource "aws_acm_certificate" "blog" {
  provider          = aws.us-east-1
  domain_name       = local.blog_domain_name
  validation_method = "DNS"

  lifecycle {
    create_before_destroy = true
  }
}


resource "aws_route53_record" "blog_cert" {
  for_each = {
  for dvo in aws_acm_certificate.blog.domain_validation_options : dvo.domain_name => {
    name   = dvo.resource_record_name
    record = dvo.resource_record_value
    type   = dvo.resource_record_type
  }
  }

  allow_overwrite = true
  name            = each.value.name
  records         = [each.value.record]
  ttl             = 300
  type            = each.value.type
  zone_id         = data.terraform_remote_state.bootstrap.outputs.route53_hosted_zone_id
}

resource "aws_acm_certificate_validation" "blog_cert" {
  provider          = aws.us-east-1
  certificate_arn         = aws_acm_certificate.blog.arn
  validation_record_fqdns = [for record in aws_route53_record.blog_cert : record.fqdn]
}
I have also added this snippet to the cloudfront.tf file in order to create the Route53 record for the CloudFront distribution with terraform too:
resource "aws_route53_record" "blog" {
  zone_id         = data.terraform_remote_state.bootstrap.outputs.route53_hosted_zone_id
  name    = var.blog_name
  type    = "A"

  alias {
    name                   = aws_cloudfront_distribution.site.domain_name
    zone_id                = aws_cloudfront_distribution.site.hosted_zone_id
    evaluate_target_health = false
  }
}
Let’s deploy it automatically Link to heading
So far so good. If you have combined my blog post with the one from Nicholas you should have a running Hugo site by now.
However, as visible in my solution diagram I wanted to have automatic blog posts creation once I push to my blog content repository.
In order to do so, we mainly need three things:
- create a CodeBuild project with a Github source repository provider (this requires authentication to GitHub)
- A webhook to trigger the CodeBuild project automatically
- provide a set of instructions to the the CodeBuild project (by defining a set of command in a buildspec file)
It should be noted that as pointed out in the codebuild_webhook terraform resource documentation the webhook requires OAuth authorization from CodeBuild to Github, which could be done manually in the Console prior to the terraform deployment of the resource.
The terraform code snippet for the webhook looks like this:
resource "aws_codebuild_webhook" "auto_update_blog" {
  project_name = module.hugo.codebuild_name

  filter_group {
    filter {
      type    = "EVENT"
      pattern = "PUSH"
    }

    filter {
      type    = "HEAD_REF"
      pattern = "main"
    }
  }
}
My buildspec.yml file has the following;
version: 0.2

env:
  parameter-store: {}

phases:
  install:
    commands:
      - echo Install dependencies...
      - yum -y install git
      - echo Downloading Hugo ${HUGO_VERSION}
      - wget -q https://github.com/gohugoio/hugo/releases/download/v${HUGO_VERSION}/hugo_extended_${HUGO_VERSION}_Linux-64bit.tar.gz
      - echo Extracting Hugo binary
      - tar -zxvf hugo_extended_${HUGO_VERSION}_Linux-64bit.tar.gz hugo
      - mv hugo /usr/local/bin
      - rm -f hugo_extended_${HUGO_VERSION}_Linux-64bit.tar.gz
    finally:
      - echo Installation done
  build:
    commands:
      - echo Entering the build static content phase
      - echo Build started on `date`
      - cd $CODEBUILD_SRC_DIR
      - git submodule init
      - git submodule update --recursive
      - /usr/local/bin/hugo
      - ls -la public
    finally:
      - echo Building the static HTML files has finished
  post_build:
    commands:
      - echo Entering the publish content phase
      - /usr/local/bin/hugo deploy --maxDeletes -1 --invalidateCDN
      - echo Publishing has finished
artifacts:
  files: []
cache:
  paths: []
And voilla, the only thing that you need to do afterwards is to git add, git commit and git push - this is how this particular blog post ended up on the Internet.
Additional links Link to heading
If you want to take a different approach, I would recommend the following blog posts:
- Static hugo site with terraform by Nicholas Armstrong
- How to build a Hugo website with AWS Lambda by Ilya Bezdelev
- Complete CI/CD for Hugo on AWS with Github Actions by Chip Zoller
- Deploying Ghost 3.0 t0 AWS with Auto Scaling, RDS and Terraform by my colleague and friend Florian Valéry